How to Group Layers in Photoshop
Grouping layers in Photoshop is like creating folders where you can place other layers and objects. Grouped layers can be incredibly useful when trying to organize your content or add effects to multiple layers at once.
How to Group Layers in Photoshop
In this example photo, I have a Photoshop project with individual layers. One is a type layer and one an image layer.
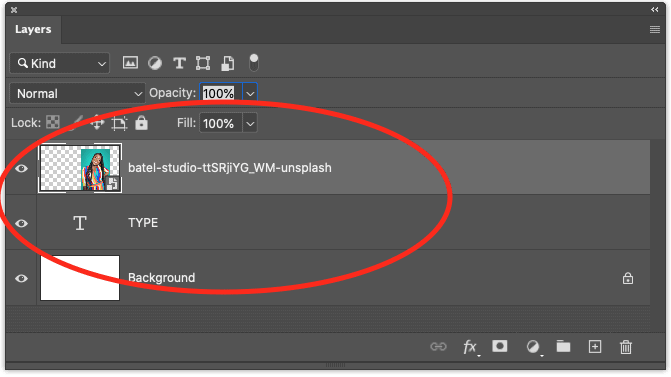
When you hold Shift and click on each it’s going to select both of them. You can also hold Command or Ctrl to select specific individual layers, holding Shift will allow you to select multiple layers in a row.
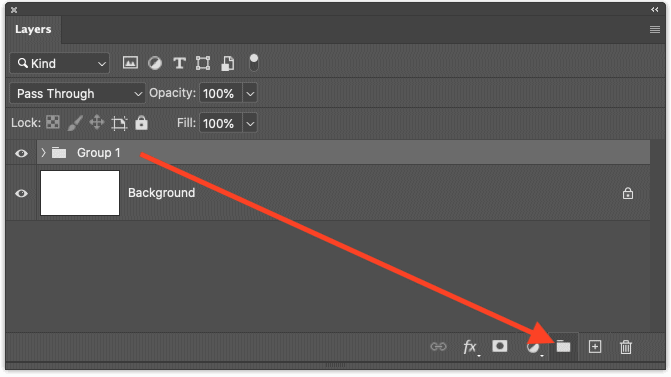
Next, all you have to do is go down to the bottom of the layers panel and click the little folder icon. It’s going to create a new group, and it’s actually going to put what you had selected into that group.
One other way to group layers is to have multiple selected and then right-click on the layers. There you will find the “Group from Layers…” option, which will create a group of your selected layers.

One last way to group layers is to go up to the Layer dropdown menu and select Layer > Group Layers. You’ll notice you can also use the shortcut key Command + G on Mac or Ctrl + G on Windows.
You can rename the group, hide or show its contents, apply effects, and even add or remove layers from the group.
How to Rename a Layer Group in Photoshop
It’s very simple to rename a group in Photoshop and it can really help in organizing your project. After all, who wants to see “Group 1”, “Group 1 copy”, “Group 1 copy 2”, and so on…?
To rename a group in Photoshop, double-click on the group name in your layers panel. This will allow you to retype the name of the group.
You can also find the option to rename groups in the Layer dropdown menu at the top of your screen. While you have your group selected, simply go to Layer > Rename Group.
How to Show/Hide Layer Group Contents in Photoshop
You might notice that your group’s contents are hidden, this is actually a nice way to clean up the layers panel when you have a lot going on in your Photoshop project.
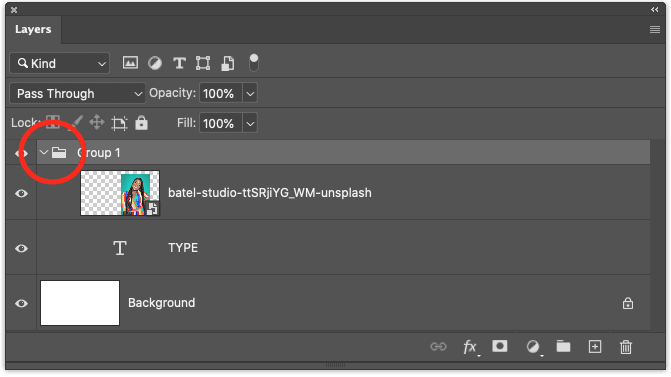
To see what’s inside of your group, use the toggle arrow located to the left of the folder icon of your group. You can show your group’s contents or hide it with this toggle arrow.
How to Transform a Layer Group in Photoshop
Instead of transforming layers individually, you can actually transform entire groups of layers as if they are one single object.
To do this, group your layers and then select the group. Press Command + T on Mac or Ctrl + T on Windows to Free Transform the entire group.
Once you’re finished, commit the transformation by pressing the Enter/Return key.
The ability to transform entire groups can be really helpful and keeps you from having to select many layers individually.
How to Add Effects to Layer Group in Photoshop
You can add layer effects to a group just as you can any layer. The effect will be added to the group as a whole, rather than the layers individually, which can give you more levels of control over your layer styles.
To add a layer style to a group, double-click on the blank area to the right of your layer name, or select your layer group and click the layer style button at the bottom of the layers panel.

Here are some of the layer effects you can add to your group:
Drop Shadow: Adds a shadow behind the layer.
Inner Shadow: Adds a shadow inside the layer.
Outer Glow: Adds a glowing effect around the layer.
Inner Glow: Adds a glowing effect inside the layer.
Bevel and Emboss: Adds a three-dimensional effect to the layer.
Satin: Adds a satin sheen effect to the layer.
Color Overlay: Changes the color of the layer.
Gradient Overlay: Adds a gradient effect to the layer.
Pattern Overlay: Adds a pattern to the layer.
Stroke: Adds a stroke (outline) to the layer.
Individual layers inside of your layer group can have separate layer styles applied to them as well. Layer groups give you a lot of control over your elements and styles.
What is the Shortcut Key to Group Layers in Photoshop?
The shortcut key to group layers in Photoshop is Command + G on Mac or Ctrl + G on Windows.
The shortcut key to ungroup objects in Photoshop is Shift + Command + G on Mac or Shift + Ctrl + G on Windows.
How to Add or Remove Layers from Groups in Photoshop
To add or remove layers from a group in Photoshop is easy. All you have to do is drag layers inside and outside of groups. You can even drag layer groups into other layer group.
You can see how this type of layer nesting can give you more control over your edits and effects in Photoshop. It can also help you organize your Photoshop files for your self and other designers!
For more beginner Photoshop tutorials, head over to my Photoshop YouTube Channel.

Spencer Martin
Spencer is a graphic designer and content creator who creates educational tutorials. He graduated with honors from Ball State University and received a BFA in Visual Communication. Today he is the Director of Content for Pacers Gaming and runs Pixel & Bracket LLC, an educational resource for creators.