How to Align Objects in Illustrator

Navigating the tools in Adobe Illustrator can be a frustrating experience when you’re first learning the program. One area to master is aligning objects in your Illustrator projects. Aligning objects is vital in graphic design. It increases the speed in which you can create graphics and allows you to have total control over the elements on your page.
How to Align Objects in Illustrator
To align objects in Illustrator, open the Align panel by navigating to Window > Align. Next, select the objects you would like to align and use the Align panel to organize your objects by selection, key object, or the artboard.
Where is the Align Panel in Illustrator?
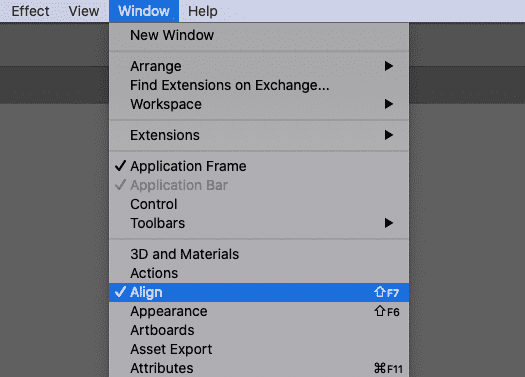
The Align panel can be found in the Window dropdown under “Align.” The shortcut key for the Align panel is Shift + F7.
You can also dock the Align panel to any of your sidebars or workspace windows. If it’s already docked, the icon will look like rectangles lined up to the left side along a vertical line.

Align Panel Options
There are a few hidden options to know when using the Align panel. To find them, you need to click the hamburger menu icon in the upper-right of the Align Panel.
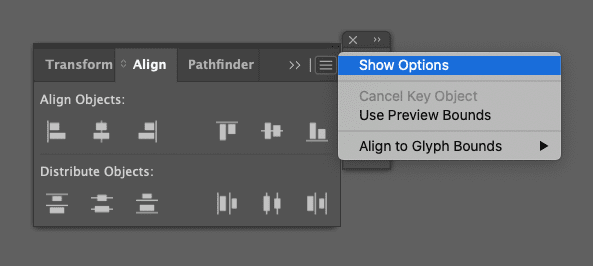
Show/Hide Options – The show and hide options toggle will allow you to see the full Align panel that includes distributing by specific units and the “Align To” options.
Use Preview Bounds – Objects in Illustrator have bounding boxes. These bounding boxes are used to align objects together. Sometimes, you can have elements of a shape or object that extend beyond the shape’s path. An example would be a stroke aligned to the outside of a shape. With “Use Preview Bounds” turned off, the Align panel will use the bounding box directly tied to the object’s path. If you turn “Use Preview Bounds” on, then the bounding box will expand to the outer edge of the entire shape, covering things like an outside stroke for example.
Align to Glyph Bounds – This option is similar to “Use Preview Bounds”, but for different types of text. The two options here are Point Type and Area Type. Point Type is text added at a specific point on your document, and it does not wrap or have a text box. Area type is a text box that wraps when it reaches its edge. Turning either option on will align objects to the true visible edge of your editable text. When turned off, the alignment tools will use the bounding box of your editable text instead (this is usually better for Area Type and worse for Point Type).
How to Align To Selection, Key Object, and Artboard
Before aligning objects in Illustrator, you need to understand how your objects are going to align. There are three options: align to selection, align to key object, and align to artboard. To adjust these, make sure you’ve checked “Show Options” in the hamburger menu.

In the bottom-right, you’ll see three icons that represent the artboard, selection, and key object.
Align to Artboard – Within your entire canvas, or work area, you will have at least one artboard. If you’d like to align objects to that artboard, make sure you select this option.
Align to Selection – In most cases, you are trying to align objects to each other. When you select multiple objects, you can align to that selection with this option.
Align to Key Object – When you want to align objects to one specific object without it moving, you can set it as the key object. To do this, select multiple objects and then click on the object you’d like to align to. You’ll see a darker outline designating that object as the key object.
How to Align to Selection in Illustrator
Now that we have the Align panel options covered, we’ll look at the actual alignment tools in the Align panel. There are two types of alignment: horizontal align and vertical align.
When you select multiple objects, Illustrator generally switches to the “Align to Selection” option. However, it’s always good to check and make sure you’re aligning to the correct parameter. If you want to align to selection in Illustrator, make sure you click the middle box in the “Align To” icons.
Horizontal Align – Using the horizontal align tools will line up your objects to the left, center, and right of their bounding boxes.
Vertical Align – Using the vertical align tools will line up your objects to the top, center, and bottom of their bounding boxes.
How to Align to Artboard in Illustrator
Sometimes we don’t want to align our objects to each other. For example, you may want to center text or another element to the middle of your artboard. To do this, make sure you have “Align To Artboard” selected in your “Align To” options.
The alignment options are the same here, with the one exception being that rather than the objects you have selected align to each other, they all align to the artboard.
If you have multiple artboards, you can select which artboard to align to by clicking on it before you use the align options.
How to Align to Key Object in Illustrator
There are many instances when you want to align objects, but not want to move an object. If you’re trying to align objects without moving one, then you need to use the “Align to Key Object” option.
Select all the objects you want to align by clicks and dragging over them, or by selecting individual objects while holding Shift.
Next, with all the objects selected, simply click on the object you want to make the key object. This will create a bolder highlight around that object. You can then use the align tools like normal, and everything will align to your key object.
Video: How to Align Objects in Illustrator
I created a video tutorial on how to align objects in Illustrator. If you learn better through video explanation, you can watch it and let me know in the comments if you have any more questions!
FAQ
Other designers have asked questions related to “how to align objects in Illustrator”. I’ll try to answer some here and hopefully help answer some of yours as well!
How do you align an object in Illustrator without moving?
The answer to this is simple, align to a key object. When you select a group of objects to align, click a second time on the object you don’t want to move. This will make it the key object, and any aligning or distributing will be based on that object. All other elements will move to line up to it, and the key object won’t move.
How to align objects to guides in Illustrator?
Guides are very useful for aligning in Illustrator. You can make guides by clicking and dragging from the ruler area. If you don’t see rulers in your document, go to View > Rulers > Show Rulers, or use the shortcut key Command + R on Mac or Ctrl + R on Windows.
We need to make sure the guides aren’t hidden or locked. Navigate to View > Guides and make sure that you Show Guides and Unlock Guides.
To align to a guide in Illustrator, select the objects and the guide. Click on the guide a second time to make it the key object. Now you can use the Align panel (Shift + F7) to align objects to your guides.
How do I turn on auto align in Illustrator?
In Illustrator, there is an auto align feature called Smart Guides. These can be turned on if you go to View > Smart Guides and make sure there is a checkmark next to it.

Smart guides help you auto align objects as you move them around your artboard. They will use other objects within your view to display pink alignment guides. You will also feel your object lock into alignment when these Smart Guides appear.
You can adjust the sensitivity and other Smart Guide options by going to Illustrator > Preferences > Smart Guides on Mac, and Edit > Preferences > Smart Guides on Windows.
Why won’t my objects align in Illustrator?
This question can have many different answers depending on the trouble you’re experiencing. Make sure none of your layers or objects are locked. Be sure to ungroup any elements if you’re trying to align them individually. For instance, if a group of objects is centered and you are trying to align everything to the left, that whole group would align but the individual objects inside the group will not.
Another issue might be that you are snapping to pixel, or snapping to the grid. In the overhead dropdown menu, go to View > Snap to Pixel and View > Snap to Grid and make sure that both are turned off.
How do you center elements in Illustrator?
Whether you want to center elements to your artboard or to your selection, the align tools are the same here. Navigate to Window > Align to open the Align panel. Select your objects, choose Align to Selection or Align to Artboard, and use the “horizontal align center” and “vertical align center” options to center your objects.
How do you align groups in Illustrator?
In Illustrator, you can group and ungroup objects. These groups work as one large object, with the edges of the group equaling the alignment bounds. So to align groups with other groups or individual objects, simply select both the group and the object and use the same alignment tools.
If you want to align objects within a group without ungrouping, double-click the group to enter into isolation mode. From there you can select and align objects individually.
Conclusion
Learning to properly align objects in Illustrator is a very powerful tool. You can take full control over your project organization as you continue to learn the Align panel tools. For anyone learning Illustrator, the align tools are one of the most important skills to master to become a more efficient designer.
For more Illustrator tutorials, take a look at my Illustrator YouTube Channel.

Spencer Martin
Spencer is a graphic designer and content creator who creates educational tutorials. He graduated with honors from Ball State University and received a BFA in Visual Communication. Today he is the Director of Content for Pacers Gaming and runs Pixel & Bracket LLC, an educational resource for creators.